Arrow script for GIMP 2.99

Hello, I am using GIMP 2.99.16-2 on a Mac Studio (OS Sonoma 14.3.1).

The old version of the script arrow.scm that I had on 2.10.34 does not work under 2.99; a Google search has shown the following links:

Has someone suggestions about where to find a working arrow script for GIMP 2.99? Thank you in advance, M.

Keep in mind that GIMP 2.99 is a development version. So not sure if things that work today will work in all future.
Maybe this one by Akkana does the job:
gimp-plugins/gimp3/arrowdesigner.py at master · akkana/gimp-plugins · GitHub.
Goes into your plugins dir, needs to be in a folder of the same name, needs to be made executable.

Well, I downloaded that py file and copied it into the 2.99/scripts/ directory; but the arrowdesigner option does not show anywhere in the drop down menus. I don’t know python, being essentially a C/C++ programmer; but the initial lines of the script say “import gi” (maybe this module is missing?) and “gi.require_version(‘Gimp’, ‘3.0’)” (while I have 2.99). Maybe I should wait some weeks/months/years for 3.0 being out…

Ah, I tried also with 2.99/plug-ins/ followed by chmod 755. Same result.

Works on my Linux Mint /GIMP 2.99 Nightly:

Well, I was not correct. Actually, arrowdesigner shows itself, in Filters > Render ; I just did not notice it. Loading a JPG image and running arrowdesigner, however, does nothing. I opened the python console, I tried to run arrowdesigner interactively and I got the following output:

GIMP 2.99.16 Python Console
Python 3.10.12 (main, Jun 14 2023, 16:51:03) [Clang 14.0.3 (clang-1403.0.22.14.1)]
>>> Gimp.get_pdb().run_procedure('python-fu-arrow-designer', [ Gimp.RunMode.INTERACTIVE, image, num_drawables, drawables, angle, size, direction])
Traceback (most recent call last):
  File "<input>", line 1, in <module>
NameError: name 'image' is not defined
>>>

Now, I am stuck. I will revert to 2.10.36 when I need to draw an arrow. :frowning:

Thank you for your quick and useful help — Maurizio

This may be of no help to you, but your question made me think about how I would do it, since I haven’t gotten around to learning how to write scripts for GIMP, neither in Python nor in Scheme.

If you know the coordinates of the arrow you want to draw, this toy MetaPost program will draw one for you, along with a “frame” with dimensions that should be chosen to fit your image.

%% ttemp.mp

outputformat := “png”;
outputtemplate := “%j%c.png”;
outputformatoptions := “format=rgba antialias=none”;

color arrow_color;

start_x = -5cm;
start_y = -5cm;

end_x = 4cm;
end_y = 6cm;

arrow_color = red;

ahlength := 1.5cm;

path frame;
frame = (-10cm, -10cm) – (10cm, -10cm) – (10cm, 10cm) – (-10cm, 10cm) – cycle;

beginfig(0);
pickup pencircle scaled 1.5mm;
%unfill frame;
draw frame;
drawarrow (start_x, start_y) – (end_x, end_y) withcolor arrow_color;
endfig;

end;

Running this command: mpost -numbersystem=“double” ttemp.mp
will produce the file `ttemp0.png’, which you could import as a layer.

This line is commented-out (after the % character, the rest of a line is ignored): %unfill frame;
If the % sign is removed, the frame will be filled with white, otherwise the inside of the frame will be transparent (except for the arrow).

start_x, start_y, end_x and end_y are parameters for the coordinates of the end points of the arrow. ahlength sets the length of the arrowhead. There’s also a (built-in) parameter ahangle for the angle, but I haven’t changed it from its default value.

MetaPost predefines the colors black (the default for drawing commands), red, blue and green. Otherwise, you can use triplets of real numbers 0 <= x <= 1 for RGB colors or similar quadruples for CMYK colors. A single number is for grayscale colors.

The frame and the arrow up to the head are drawn with the pen specified in the “pickup” command.
Of course, it could be scaled to a different size.

outputformat can be “png”, “eps” (the default) or “svg”. Here, I use the rgba color model (i.e., rgb + alpha) with no antialiasing. The default units are PostScript points (1/72 in), so I specify the units.

The MetaPost manual can be found here: https://tug.org/docs/metapost/mpman.pdf

Thank for your interest, Laurence. I have used TeX and METAFONT in the past (yes, I am old) and understand what your program is doing. I will keep your suggestion in mind.

You’re very welcome. It is true that there doesn’t seem to be much interest in MetaPost and METAFONT anymore, which is a shame, because they contain many brilliant ideas.

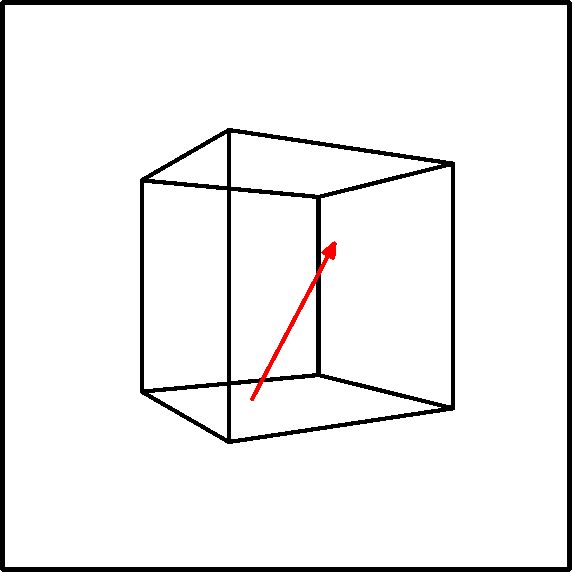
At the risk of blowing my own horn, it is also possible to draw “3D” arrows, that is, arrows using 3D coordinates that are subsequently projected using the perspective projection, using my program, GNU 3DLDF, which implements a language similar to the METAFONT language, and produces MetaPost as its output. This might be useful, if your original graphic is a 3D image.

The following toy 3DLDF program draws such a “3D” arrow within a cuboid. It should be fairly intuitive, if you’re familiar with MetaPost. Of course, the lines* and the arrowhead aren’t put into perspective, but this is standard for technical drawings (and not easy to change).

  • That is, the thickness of the lines doesn’t change according to the distance from the focus. Of course, the lines themselves are in perspective.

%% ttemp.ldf

% PNG
verbatim_metapost “outputformat:=\“eps\”;outputtemplate := \”%j%c.png\“;”
& “ahlength := .5cm;”
& “outputformatoptions := \“format=rgba antialias=none\”;”;

% EPS
% verbatim_metapost “outputformat:=\“eps\”;outputtemplate := \”%j%c.eps\“;”
% & “ahlength := .5cm;”;

path frame;
frame := (-10cm, -10cm) – (10cm, -10cm) – (10cm, 10cm) – (-10cm, 10cm) – cycle;

focus f;
set f with_position (0, 0, -10) with_direction (0, 0, 10) with_distance 20;

start_x := -6;
start_y := -4;
start_z := -8;

end_x := 8;
end_y := 3;
end_z := 7;

color arrow_color;
arrow_color := red;

beginfig(0);
pickup pencircle scaled (1.5mm, 1.5mm, 1.5mm);
unfill frame;
draw frame;
%shift current_picture (0, -2);
output current_picture with_projection parallel_x_y;
clear current_picture;

cuboid c;
c := unit_cuboid scaled (12, 12, 12);
draw c;

drawarrow (start_x, start_y, start_z) – (end_x, end_y, end_z) withcolor arrow_color;

rotate current_picture (0, 30);
shift current_picture (0, 0, 20);

endfig with_focus f;

verbatim_metapost “end;”;

end;

If EPS output is produced instead of PNG, the resulting file can be included the following TeX file and the following commands will produce a PDF file:

tex ttemp
dvipdfmx ttemp

%% ttemp.tex

\nopagenumbers

\input epsf

%% * (1)

\special{papersize=210mm, 297mm} %% DIN A4 Portrait
\hsize=210mm
\vsize=297mm

\topskip=0pt
\parskip=0pt
\parindent=0pt
\baselineskip=0pt

\advance\voffset by -1in
\advance\hoffset by -1in

\topskip=0pt
\parskip=0pt
\parindent=0pt
\baselineskip=0pt

%% *** (3)

\def\epsfsize#1#2{#1}

%% *** (3)

\vbox to \vsize{\vss\hbox{\epsffile{ttemp0.eps}\hss}\vss}
\eject

\bye

Maurizio Loreti via GNOME Discourse writes:

Well, I was not correct. Actually, arrowdesigner shows itself, in Filters > Render ; I just did not notice it. Loading a JPG image and running arrowdesigner, however, does nothing. I opened the python console, I tried to run arrowdesigner interactively and I got the following output:

Maurizio and I corresponded on this, and the issue turns out to be that Maurizio is running 2.99.16 from flatpak, but GIMP has changed its Python API since then. So the previous version of arrowdesigner, before I updated it for the new API, works; and when 2.99.18 releases, then the current version should work.

Just one of those occupational hazards when using a program that’s under active development!

(I hope this makes it to the list; it’s my first time posting to discourse via email reply.)

    ...Akkana

This topic was automatically closed 45 days after the last reply. New replies are no longer allowed.